Several people have asked about the animated marker on the table of contents for my articles.
All credit for this ultimately goes to Hakim El Hattab. He created the original, mesmerizing Progress Nav demo, and it is genius. My implementation is a bit different, but the core idea is the same. Let’s go over how it works under the hood.
Let’s start with the markup
In the HTML, there is an absolutely positioned SVG that covers the entire table of contents <nav> element. If you’re using Astro, check out my article on building the table of contents from markdown headings.
<nav class="toc">
  <ul>
    <li><a href="#heading-1">Heading 1</a></li>
    <!-- ... -->
  </ul>
  <svg class="toc-progress" xmlns="http://www.w3.org/2000/svg">
    <path
      class="toc-marker"
      fill="none"
      stroke="currentColor"
      stroke-width="2"
      stroke-dasharray="1 0 0 1000"
      stroke-dashoffset="1"
      stroke-linecap="round"
      stroke-linejoin="round"
    ></path>
  </svg>
</nav>

<style>
  .toc-progress {
    position: absolute;
    top: 0;
    left: 0;
    width: 100%;
    height: 100%;
  }
</style>
Drawing a path along the links
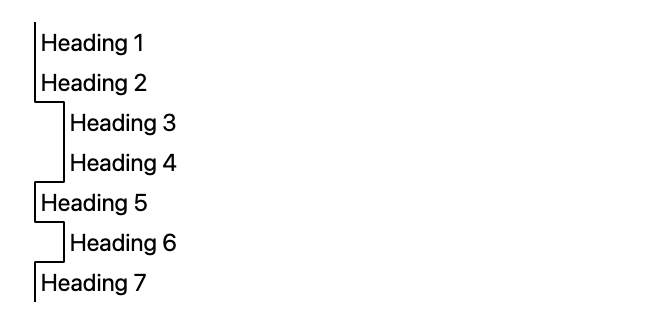
Now that the SVG covers the entire <nav>, a <path> needs to be drawn alongside all the links in the table of contents. More specifically, the offsetTop, offsetLeft, and offsetHeight for each link needs to be added to the path’s d (data) attribute.
function drawPath() {
  const path = document.querySelector('path.toc-marker');
  const links = Array.from(document.querySelectorAll('nav.toc a'));
  if (!links.length) return;

  // Start with an empty array of path data values (joined with
  // spaces later)
  let pathData = [];
  let left = 0; // The last x position / indentation

  // Iterate over each link to build up the pathData
  links.forEach((link, i) => {
    const x = link.offsetLeft;
    const y = link.offsetTop;
    const height = link.offsetHeight;
    if (i === 0) {
      // Like drawing with a pen...
      // 'M'ove to the top left of the first link,
      // and then draw a 'L'ine to the bottom left
      pathData.push('M', x, y, 'L', x, y + height);
    } else {
      // If the current link is indented differently than the last,
      // then come down to the current link's top before moving
      // left or right. This ensures we get 90-degrees angle at the
      // corners.
      if (left !== x) pathData.push('L', left, y);

      // Draw a line to the top left of the current link
      pathData.push('L', x, y);

      // Draw a line to the bottom left of the current link
      pathData.push('L', x, y + height);
    }

    // Save the current link's x position to compare with the next
    // link
    left = x;
  });

  // Apply all this path data to the path's d attribute
  path.setAttribute('d', pathData.join(' '));
}
The path runs alongside the links now, so let’s talk about animation.
SVG stroke animation
If you’ve seen an animation before where an SVG path appears to be handdrawn on the page, then you may be familiar with stroke-dasharray and stroke-dashoffset. First, let’s talk about stroke-dasharray. This is the property on our SVG path that defines repeating dashes and gaps between dashes along the path.
stroke-dasharray: 10; /* 10px dash, 10px gap */
stroke-dasharray: 10 5; /* 10px dash, 5px gap */
stroke-dasharray: 10 5 2; /* 10px dash, 5px gap, 2px dash, 5px gap */
stroke-dasharray: 10 5 2 5; /* 10px dash, 5px gap, 2px dash, 5px gap, 10px dash, 5px gap ... */
For a typical draw-the-line animation, you would start by setting the stroke-dasharray and stroke-dashoffset to the length of the path. If you have a 100px path, setting the stroke-dasharray to 100 means you have a dash extending the whole length of the path, and a gap that extends the same length beyond what is visible. However, by also setting the stroke-dashoffset to 100 we are telling it to start with the gap, so the path is effectively invisible.
path {
  stroke-dasharray: 100; /* 100px dash, 100px gap */
  stroke-dashoffset: 100; /* Start drawing at the gap */
}
Now, when you animate the stroke-dashoffset to 0, the gap will move to the beginning of the path, and the dash will appear to be drawn on the page.
path {
  stroke-dasharray: 100;
  stroke-dashoffset: 100;
  animation: draw 1s alternate;
}

@keyframes draw {
  to {
    stroke-dashoffset: 0;
  }
}
Animating with only stroke-dasharray
Of course, it is possible to create animations using stroke-dasharray by itself. Below is an example where we start with a 0px dash and a 2px gap, and then animate to a 2px dash and a 0px gap.
path {
  animation: dash-anim 1s ease-in-out alternate infinite;
  stroke-dasharray: 0 2;
}
@keyframes dash-anim {
  to {
    stroke-dasharray: 2 0;
  }
}
Here is a similar animation applied to a <rect> with stroke-linecap: round. With round line caps, a zero-pixel dash renders as a dot.
rect {
  stroke-dasharray: 0 4;
  animation: dash-anim 1s ease-in-out alternate infinite;
  transform: rotate(45deg);
  transform-origin: center;
}
@keyframes dash-anim {
  to {
    stroke-dasharray: 4 0;
  }
}
And here is another example with a <circle>. The magic number of 2.513 is the circumference of the circle divided by five (in order to create five points along the circle’s path). There is also a rotation applied in the opposite direction of the path flow, so the dashes appear to expand in place.
circle {
  animation: dash-anim 1s ease alternate infinite;
  transform-origin: center;
  transform: rotate(18deg);
  stroke-dasharray: 2.513 0;
}
@keyframes dash-anim {
  to {
    transform: rotate(54deg);
    stroke-dasharray: 0 2.513;
  }
}
The stroke-dasharray goal
Now that we have a basic understanding of how to animate these dashes, let’s get back to the table of contents. We need to figure out how to create a dash that extends along the links to visible sections of our page.
Our stroke-dasharray value needs to be something like 1 a b T, where:
1defines a 1px dash at the beginning. This is only necessary becausestroke-dasharraystarts with a dash, and setting it to0would result in a dot, as shown in previous examples. We really want to start with a gap, which is why we already specifiedstroke-dashoffset="1"in our markup to skip over this dash.ais a gap to the top of the first active link.bis the distance to the bottom of the last active link. This is the length of our visible dash.Tis the total length of the path. This creates a gap that is guaranteed to extend to the end of the path (and beyond), so we only end up with our single dash.
Gettings each link’s segment along the path
We can update our drawPath function to run getTotalLength() as it is building the path in order to get the running distances to the tops and bottoms of all the links.
// Create some WeakMaps to store the distances to the top and
// bottom of each link
const linkStarts = new WeakMap();
const linkEnds = new WeakMap();

function drawPath() {
  const path = document.querySelector('path.toc-marker');
  const links = Array.from(document.querySelectorAll('nav.toc a'));
  if (!links.length) return;

  let pathData = [];
  let left = 0;
  links.forEach((link, i) => {
    const x = link.offsetLeft;
    const y = link.offsetTop;
    const height = link.offsetHeight;
    if (i === 0) {
      // The top of the first link starts at 0px along the path.
      linkStarts.set(link, 0);
      pathData.push('M', x, y, 'L', x, y + height);
    } else {
      if (left !== x) pathData.push('L', left, y);
      pathData.push('L', x, y);

      // Apply the current path data to the path element
      path.setAttribute('d', pathData.join(' '));

      // Get the total length of the path now that it extends
      // to the top of this link, and store it in our linkStarts
      // WeakMap.
      linkStarts.set(link, path.getTotalLength());
      pathData.push('L', x, y + height);
    }
    left = x;

    // Apply the current path data to the path element again
    path.setAttribute('d', pathData.join(' '));

    // Get the length of the path that now extends to the
    // bottom of this link, and store it in our linkEnds WeakMap.
    linkEnds.set(link, path.getTotalLength());
  });
  // We no longer need to call `path.setAttribute('d')` at the end
  // since we are doing it in the loop.
}
Marking active links
At this point, let’s go ahead and write some code to add an .active class to the links whose sections are visible in the viewport. An IntersectionObserver is perfect for this. It will only fire when our sections enter or leave the viewport.
// Create an IntersectionObserver to watch the sections of the
// article as they scroll in and out of view
addIntersectionObserver();

function addIntersectionObserver() {
  const observer = new IntersectionObserver((sections) => {
    sections.forEach((section) => {
      const heading = section.target.querySelector('h2, h3, h4, h5');
      if (!heading) return;
      const id = heading.getAttribute('id');

      // Get the link to this section's heading
      const link = document.querySelector(`nav.toc li a[href="#${id}"]`);
      if (!link) return;

      // Add/remove the .active class based on whether the
      // section is visible
      const addRemove = section.intersectionRatio > 0 ? 'add' : 'remove';
      link.classList[addRemove]('active');
    });
    updatePath(); // We will write this next
  });

  // Observe all the sections of the article
  document.querySelectorAll('article section').forEach((section) => {
    observer.observe(section);
  });
}
Updating our path’s stroke-dasharray
So far, we:
- Drew an SVG path that extends from the top of the first link to the bottom of the last link.
- Stored the distances to the top and bottom of each link.
- Created an
IntersectionObserverthat adds an.activeclass to the links whose sections are visible in the viewport.
The big thing that is left to do is update the stroke-dasharray of our path to extend from the top of the first active link to the bottom of the last active link.
Below is the updatePath function, which we will call every time the IntersectionObserver fires.
function updatePath() {
  const path = document.querySelector('path.toc-marker');
  const pathLength = path.getTotalLength();
  const activeLinks = document.querySelectorAll('nav.toc a.active');
  let linkStart = pathLength;
  let linkEnd = 0;
  activeLinks.forEach((link) => {
    // Set linkStart to the top of the earliest active link
    linkStart = Math.min(linkStart, linkStarts.get(link));
    // Set linkEnd to the bottom of the furthest active link
    linkEnd = Math.max(linkEnd, linkEnds.get(link));
  });
  // If there are no active links, hide the path
  path.style.display = activeLinks.length ? 'inline' : 'none';
  // FINALLY, do the thing!
  path.setAttribute('stroke-dasharray', `1 ${linkStart} ${linkEnd - linkStart} ${pathLength}`);
}
Wait, isn’t it supposed to animate?
The only thing left to do for that smooth animated look is to add a transition to the path’s stroke-dasharray property.
path.toc-marker {
  transition: stroke-dasharray 0.3s ease;
}
Handling resizing
Although the IntersectionObserver will handle the cases where our article reflows on resize, what if our table of contents is resized causing our links to wrap?
Rather than listen for a resize event, a more optimized way to handle this is to use a ResizeObserver. We can use it to only observe changes to the table of contents.
addResizeObserver();

function addResizeObserver() {
  if (!document.querySelector('nav.toc')) return;
  const observer = new ResizeObserver(() => {
    drawPath();
    updatePath();
  });
  observer.observe(document.querySelector('nav.toc'));
}
Live demos
Here is a codepen where you can see all of the above code in action, along with some minimal styling.
As a grand finale to this article, I came up with another fun demo that features a horizontal navigation with a squiggly marker that wriggles to the active link. Happy animating!
Webmentions
Christopher Graves, Marty McGuire, Nowell Strite, Riley S. Faelan, and 8 others liked this.
Jan, Kurau :tokyo:, slims :miyagi:, Khalid ⚡, and 2 others reposted this.
@kevinleedrum this is really neat. 😊 Such delight! 😁
@noleli 💯 Squiggly squad!
@kevinleedrum hello from one squiggly/wavey nav person to another! :D https://codepen.io/noleli/pen/abEaJLe Plucky: a standing wave underline